Ever wonder how professional designers create that fancy gold lettering that they use in their designs? Today, I am going to show you just how easy it is to create your very own shiny gold lettering. This is an intermediate Photoshop tutorial. If you run into any difficulties, watch the instructional video at the end of this tutorial.
Here is the design that we are going to create:

Step 1: The Set Up
Open Photoshop and create a new document that is 800px by 200px. Fill the background with a dark grey colour. Select the Type Tool (T) and type out 'PIXELLOGO' on the stage.Change the font to Myriad Pro, Bold, 145px.
Step 2: Adding a Drop Shadow
Now that the initial set up is done, we are going to add our gold effect to the text. In the main menu, go to Layer -> Layer Style -> Drop Shadow. This will open your Layer Style Dialogue Box. We will be working in the Layer Style Dialogue box for the rest of this tutorial.
Select Drop Shadow. Set your settings to the same as those pictured below.

Step 3: Adding an Inner Shadow
Still in the same Layer Style Dialogue Box, select Inner Shadow. Set your settings to the same as those pictured below. The colour yellow that I use is #ffe241.

You should now end up with something like this:

Step 4: Adding a Gradient Overlay
Here is where it gets a little tricky. If you get lost or confused, please watch the video below. Again, still in the Layer Style Dialogue Box, click on Gradient Overlay. Keep the default settings as they are and click on the gradient in the Layer Style Dialogue Box to create a custom gold gradient. Set your gradient so that it looks like the one pictured below. The colour codes for each colour are as follows (from left to tight): #fff3ba, #fee185, #fff0c0, #cc9850, #fff3c6. Once your gradient is set, click 'New' so that your gradient is saved in your presets.

You should now have something like this:

Step 5: Adding a Stroke
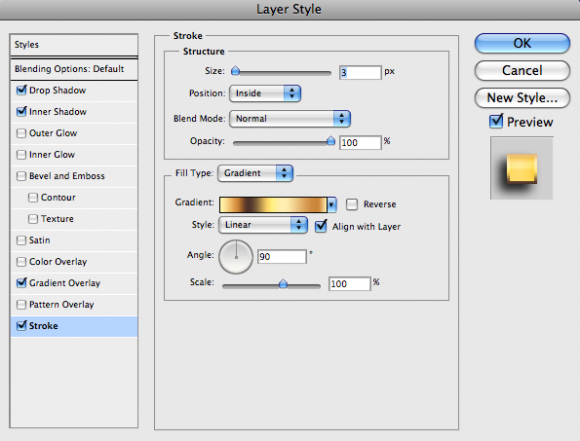
Again, in your Layer Style Dialogue Box, select Stroke. Set your settings to those pictured below and where it says, Fill Type, select Gradient. The gradient that we are going to use for the stroke is the same as the first gradient that we created with two new colours added. Click on and load the first gradient that you created in the presets. Now, add the two colours #cc9850 and #5d4539. This is what your gradient should look like:

Now, set your Stroke settings to the same as those below and you are finished!

Here is a video to help guide you through the steps: